U-boot移植应用开发手册
目录
适用人员
本文适用于需要使用Uboot的所有人员。
开发环境
Uboot代码编译环境,环境搭建见:快速入门
Siflower开发板测试环境。
相关背景
UBOOT属于bootloader的一种,是用来引导启动系统/内核的。随着客制化的需求越来越多,硬件的差异也越来越多,而不同的硬件需要不同的引导程序,所以就需要适配不同的Uboot,开发对应的Uboot就显得尤为重要。
功能概述
本文介绍了U-boot的结构和使用方法。其中使用方法包括了代码下载,开发,编译,烧录uboot镜像,以及通过uboot更新内核镜像。本文介绍的U-boot包括了uboot-spl和uboot两部分。
U-boot的介绍
SPL
SPL是介于芯片内部rom程序与uboot之间的一个BootLoader,其主要功能为初始化ddr,系统管理器,时钟,以及加载uboot。SPL程序本身需要加载到系统内部ram中运行,是一个轻量级的uboot。
在U-boot开源程序中,本身是包含SPL选项的。Uboot-spl是用Uboot同一套代码,通过CONFIG_SPL_BUILD宏分割编译出的结果。在MPW0和MPW1的测试时,我们采用了Uboot-spl作为Irom与Uboot之间的BootLoader,但FULLMASK版本将芯片内部ram减少到了64KB,不足以同时支持Uboot-spl的rom+ram的需求,因此采用了一份裸机实现的bare_spl。Bare_spl相比于原Uboot-spl更加简单可控,也可以同样实现引导uboot的功能。同时,bare_spl也同时支持mpw0和mpw1芯片,并且减少了存储空间,为flash优化、分区的重新定义提供了支持。 SPL的流程如下(uboot-spl和bare-spl实现主要功能一致):
graph TB
  title(SPL 流程图)
  A(IROM) --> B[CPU初始化]
  B -->  C[板级初始化]
  C -->  D[DDR初始化]
  D -->  E[从device读取镜像]
  E -->  F[校验镜像信息]
  F -->  G[跳转到uboot]
  G -->  H[uboot]
在bare_spl中,默认支持三种boot device:spi-flash,sd card,emmc。按照spi>sd>emmc的优先级,只要检测到device存在,spl便会自动从其启动。因此如果想要在同时包含spi-flash与sd的板子中,使用sd作为device存放uboot镜像,需要定义SKIP_SPI_FLASH。由于spi与emmc存在复用关系,因此不会同时存在。Uboot-spl需要在编译阶段就指定使用哪一种boot device。而SF19A2890目前仅支持一种boot device:spi-flash,依据读取flash型号决定使用nand falsh还是nor flash。 SPL与uboot相同,引导的镜像需要包含一个uimage的header,其中会包含所引导镜像的类型。因此,SPL不只可以引导uboot,进而启动内核,还可以引导pcba测试程序。
U-boot
Uboot的启动分为两个阶段:stage1和stage2。stage1可以认为是uboot认定的rom阶段,stage2是ram阶段。Stage1向stage2转换的主要标志就是代码段的relocation,即将代码段从“rom”复制到“ram”。
Uboot的流程图如下: 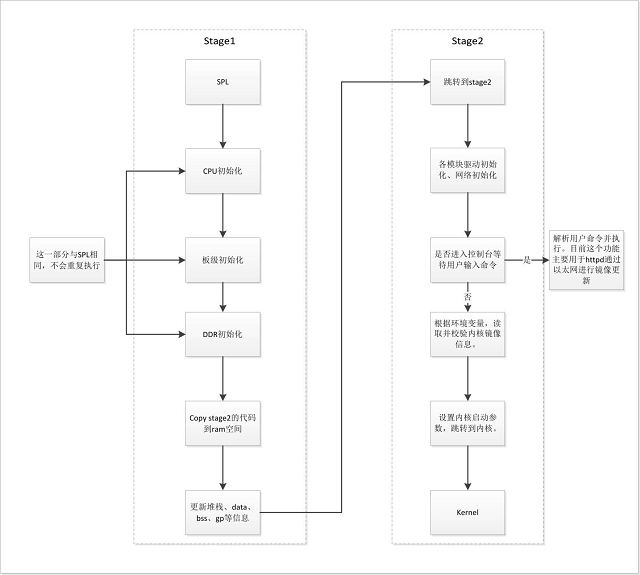
每个stage都有一个主要执行的函数序列,即init_sequence_f和init_sequence_r。由于SPL的存在,uboot的stage1其实并没有什么实质性的功能,整个uboot都是运行在ddr上的。在进入stage2前,uboot会进行一个代码段的重定向,由于uboot本身是位置无关的,因此只需要同时更新堆栈信息,全局变量表等即可,重定向后的代码依旧可以正常执行。按照uboot的思想,这个stage2是运行在ram中的,因此速度要比stage1要快。
init_sequence_r中主要是进行了各个模块驱动的初始化,网络的初始化和一些其他准备工作,比如环境变量的初始化等。在准备结束后,uboot最终会进入一个main_loop,进行控制台的初始化。此时uboot提供了一个3s的倒计时,如果不在时间内从控制台(默认串口)进行输入,则会进入自动启动流程,根据预设的环境变量参数,进行引导启动;如果有输入,就可以停下来进入控制台,与uboot进行交互。此时uboot会根据输入的命令情况进行解析并执行,目前支持的命令如下:
sfa18 # help
?       - alias for 'help'
base    - print or set address offset
bdinfo  - print Board Info structure
boot    - boot default, i.e., run 'bootcmd'
bootd   - boot default, i.e., run 'bootcmd'
bootelf - Boot from an ELF image in memory
bootm   - boot application image from memory
bootp   - boot image via network using BOOTP/TFTP protocol
bootvx  - Boot vxWorks from an ELF image
cmp     - memory compare
coninfo - print console devices and information
cp      - memory copy
crc32   - checksum calculation
date    - get/set/reset date & time
dhcp    - boot image via network using DHCP/TFTP protocol
dm      - Driver model low level access
echo    - echo args to console
editenv - edit environment variable
env     - environment handling commands
exit    - exit script
false   - do nothing, unsuccessfully
fdt     - flattened device tree utility commands
go      - start application at address 'addr'
help    - print command description/usage
httpd   - start www server for firmware recovery with [localAddress]

iminfo  - print header information for application image
imxtract- extract a part of a multi-image
itest   - return true/false on integer compare
loop    - infinite loop on address range
lzmadec - lzma uncompress a memory region
md      - memory display
mm      - memory modify (auto-incrementing address)
mmc     - MMC sub system
mmcinfo - display MMC info
mw      - memory write (fill)
nm      - memory modify (constant address)
ping    - send ICMP ECHO_REQUEST to network host
printenv- print environment variables
reset   - Perform RESET of the CPU
run     - run commands in an environment variable
saveenv - save environment variables to persistent storage
setenv  - set environment variables
sf      - SPI flash sub-system
showvar - print local hushshell variables
sleep   - delay execution for some time
source  - run script from memory
spld    - update spl from device
test    - minimal test like /bin/sh
tftpboot- boot image via network using TFTP protocol
true    - do nothing, successfully
version - print monitor, compiler and linker version
想要增加新的命令,可以通过menuconfig在编译时选择对应的command。如果有新的功能需求,也可以添加自己的命令进去,只需要按照格式在cmd目录下添加相应处理函数并注册即可。
其中有一些常用的命令:boot 可以让uboot继续执行默认命令; reset 可以重启;sf 与 mmc 分别对应spi-flash与mmc的操作命令。Spld 与 httpd 会在后面镜像更新部分详述。
Uboot环境变量可以通过env命令进行查询和设置:
sfa18 # env print -a
baudrate=115200
bootcmd=sf probe 0 33000000;sf read 0x81000000 0xa0000 0xa00000;bootm
bootdelay=2
ethact=sf_eth0
fdtcontroladdr=8fe9d57c
stderr=serial@8300000
stdin=serial@8300000
stdout=serial@8300000

Environment size: 219/65532 bytes

sfa18 # setenv efuse_data aabbccdd
sfa18 # printenv efuse_data
efuse_data=aabbccdd
通过环境变量可以设置一些如串口波特率,auto boot delay时间等,最终环境变量会保存u-boot-env分区中,因此下次启动也是有效的。
Uboot引导kernel也是通过控制台命令进行的,默认的命令bootcmd保存在default env中,可以在include/configs/sfax8.h中进行配置。目前这个过程分为两步:1.将镜像从boot device中读到ram中。2.引导ram中的镜像。
根据boot device的不同,读取的命令也不同。从spi-flash中加载是通过 sf 命令实现的:
sfa18 # help sf
sf - SPI flash sub-system
Usage:
sf probe [[bus:]cs] [hz] [mode] - init flash device on given SPI bus
                                  and chip select
sf read addr offset|partition len       - read `len' bytes starting at
                                          `offset' or from start of mtd
                                          `partition'to memory at `addr'
sf write addr offset|partition len      - write `len' bytes from memory
                                          at `addr' to flash at `offset'
                                          or to start of mtd `partition'
sf erase offset|partition [+]len        - erase `len' bytes from `offset'
                                          or from start of mtd `partition'
                                         `+len' round up `len' to block size
sf update addr offset|partition len     - erase and write `len' bytes from memory
                                          at `addr' to flash at `offset'
                                          or to start of mtd `partition'
sf protect lock/unlock sector len       - protect/unprotect 'len' bytes starting
                                          at address 'sector'
sfa18 #
根据当前的分区情况,uboot从flash的0xa0000位置加载内核镜像,并读取到ram地址0x81000000。
sfa18 # sf probe 0 33000000
do_spi_flash----cmd = probe
SF: Detected W25Q128BV with page size 256 Bytes, erase size 4 KiB, total 16 MiB
sfa18 # sf read 0x81000000 0xa0000 0xa00000
do_spi_flash----cmd = read
device 0 offset 0xa0000, size 0xa00000
SF: 10485760 bytes @ 0xa0000 Read: OK
sfa18 #
Sf read的最后一个参数是读取的长度,目前默认是0xa00000,10MB。
从设备中读取镜像后,从ram引导镜像的命令为bootm:
sfa18 # help bootm
bootm - boot application image from memory

Usage:
bootm [addr [arg ...]]
    - boot application image stored in memory
        passing arguments 'arg ...'; when booting a Linux kernel,
        'arg' can be the address of an initrd image
        When booting a Linux kernel which requires a flat device-tree
        a third argument is required which is the address of the
        device-tree blob. To boot that kernel without an initrd image,
        use a '-' for the second argument. If you do not pass a third
        a bd_info struct will be passed instead

Sub-commands to do part of the bootm sequence.  The sub-commands must be
issued in the order below (it's ok to not issue all sub-commands):
        start [addr [arg ...]]
        loados  - load OS image
        ramdisk - relocate initrd, set env initrd_start/initrd_end
        fdt     - relocate flat device tree
        cmdline - OS specific command line processing/setup
        bdt     - OS specific bd_t processing
        prep    - OS specific prep before relocation or go
        go      - start OS
sfa18 #
Bootm启动的默认地址由CONFIG_SYS_LOAD_ADDR宏来定义,目前为0x81000000。因此可以通过任何方法将镜像加载到ram的这个地址后通过bootm引导,而不仅限于从flash中读取。
sfa18 # bootm
## Booting kernel from Legacy Image at 81000000 ...
   Image Name:   MIPS OpenWrt Linux-3.18.29
   Created:      2017-08-31   6:27:49 UTC
   Image Type:   MIPS Linux Kernel Image (lzma compressed)
   Data Size:    1635008 Bytes = 1.6 MiB
   Load Address: 80100000
   Entry Point:  80105360
   Verifying Checksum ... OK
   Uncompressing Kernel Image ... OK
代码下载、编译
代码下载
- 账号注册
uboot代码需要向siflower申请gerrit权限,同意开放后需要提供相关邮箱进行账号注册,注册通过后会给到对应的账号以及密码
账号登录
- 获取账号后,使用账号密码登陆gerrit网站
获取代码
登陆gerrit.siflower.cn:9011后
打开申请列表可以看到代码仓库信息,获取复制下载链接
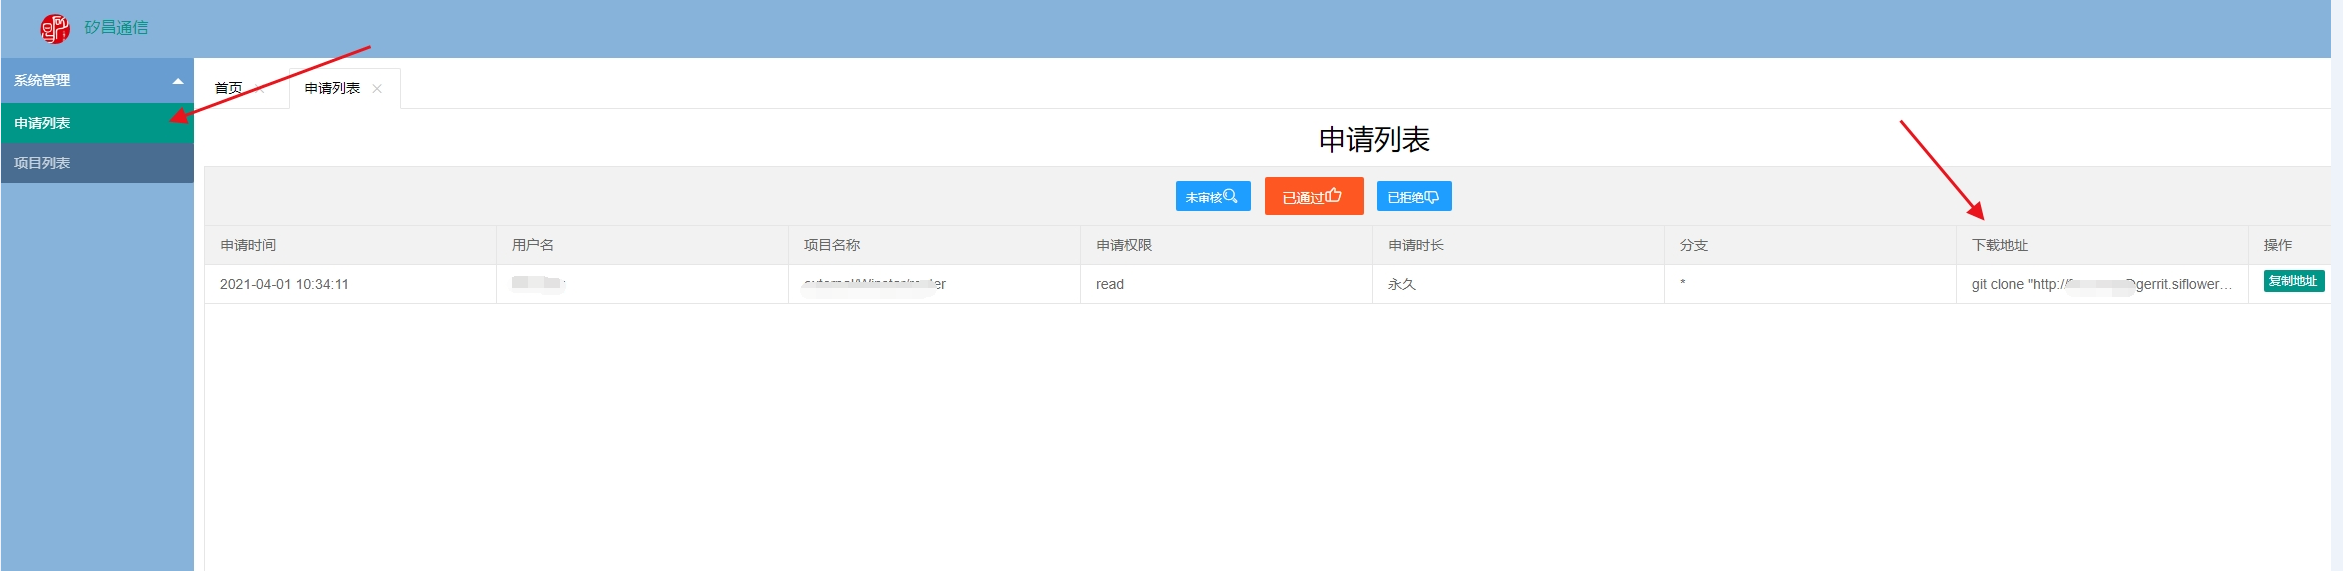
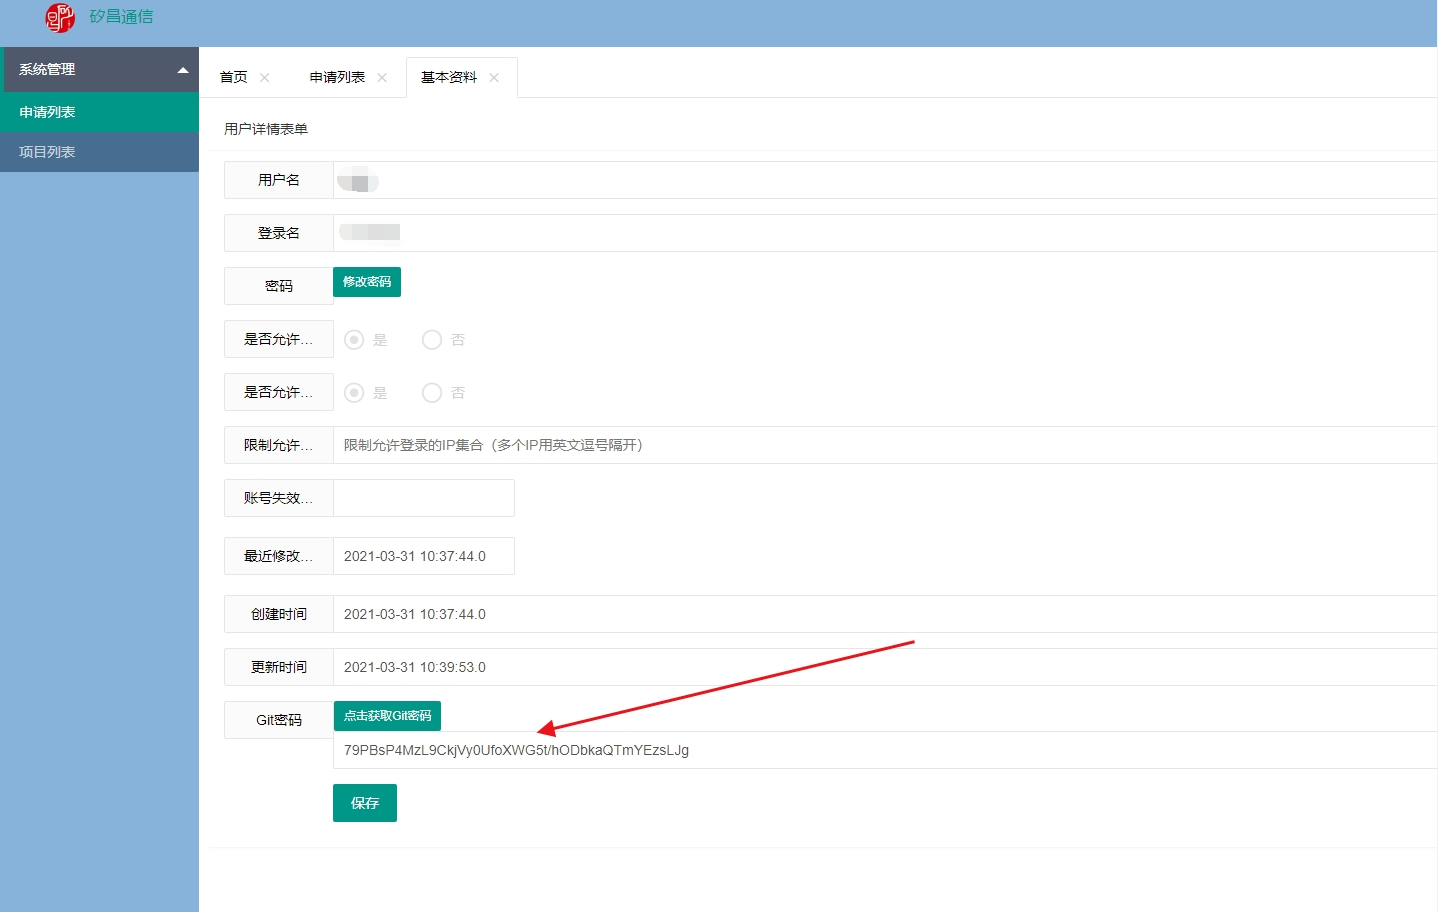
开始下载代码,下载密码在基本资料,Git密码
开始下载
编译
- 编译uboot
由于同时需要spl和uboot两部分,而为了简化烧录过程,会将两部分拼成一个镜像,统一作为BootLoader,因此uboot的编译推荐直接使用编译脚本sf_make.sh。
由于存在不同的板型和芯片,因此该脚本还支持若干个参数:use_mti,ver,prj,mode和cmd。
use_mti:表示编译工具链选择,支持0(默认)和1。其中0表示使用当前目录toolchain中工具链,1表示使用系统编译工具链。 Cmd:表示命令,支持distclean、clean、make、dmake(默认)。其中dmake指的是先进行distclean,再make。
Mode:表示选择release或debug模式,支持r(默认)和d。Mode=r时编译出的binary文件包含设备树信息,elf debug文件不包含;mode=d时binary不包含,debug文件包含。Mode=d一般是配合jtag进行调试使用的。
Ver:表示芯片型号,支持mpw0(默认)、mpw1和fullmask。
Prj:表示板型,支持sfa28_evb、sfa28_p20b、sfa28_ac28等
因此,实际编译时只要根据板子的情况,设置非default的参数即可。比如想要编译一个flash启动的fullmask最新evb镜像,编译命令如下:
./sf_make.sh ver=fullmask
想要提交代码时,可以通过
./sf_make.sh cmd=clean
删掉编译生成的多余文件。
- 编译带版型编号的uboot镜像
当需要生成正式的带版型名称编号分支版本号等信息的uboot镜像时,可以使用如下面指令进行编译,具体可以参考该脚本的实现
./make.sh sfa28_evb
这样编译的进行会生成在根目录,此镜像就等同于uboot/sfax8/uboot_full.img,但是带有分支版型版本号等信息
编译结果
编译生成的文件均copy到了uboot/sfax8/目录下,包括:
uboot_full.img:spl和uboot的组合,烧录就使用这个文件。
spl_128k.img:spl编译的binary镜像添加了irom-header后,扩充到128KB的结果,可以用于更新mpw验证代码在使用boot_ddr时的BootLoader.bin。
u-boot.img:uboot的binary镜像加uimage header。
u-boot-spl.img:spl binary加irom header。
p20b.img:与uboot_full.img相同,会以板子型号命名。
以太网烧录
适用平台
sf16a18/sf19a28 evb开发板。
烧录步骤
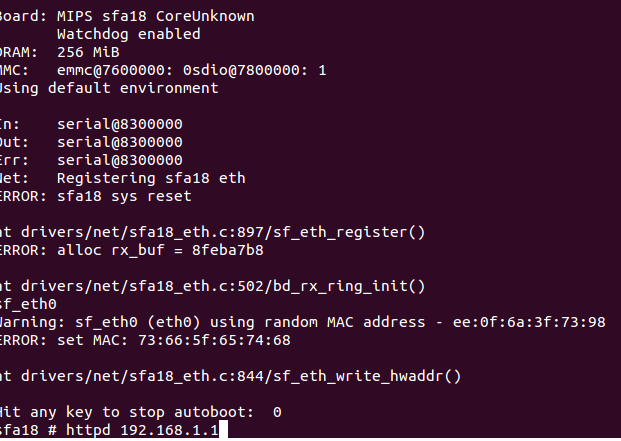
- 板子接串口,重启进入uboot,回车进入command模式,输入命令httpd 192.168.1.1 (或者其它和PC同网段的ip),回车,界面如下:
- 电脑网线接板子上的网口。
浏览器地址根据不同的需求输入不同的网址,如下表,以192.168.1.1为例:
| 网址 | 功能 | 适合文件 |
|---|---|---|
| 192.168.1.1 | 烧录firmware | *sysupgrade.bin, uImage-initramfs.lzma, uImage.lzma |
| 192.168.1.1/uboot.html | 烧录纯uboot | uboot_full.img (慎用) |
正常的烧录界面如下: 
- 烧录完毕会自动重启
uboot新版型引入
uboot引入新版型主要涉及到新版型配置文件改动,以太网驱动适配等,下面将以ac28为例给出uboot新版型引入的示例。
配置文件适配
增加对应版型的配置文件夹,如uboot/board/siflower/sfa28_ac28/,目录内容如下:
qin@ubuntu:~/uboot$ ls board/siflower/sfa28_ac28/
Kconfig  MAINTAINERS  Makefile
其中Kconfig定义了版型的名字等信息,MAINTAINERS定义了配置文件的地址,Makefile定义了新版型编译的方式。
修改公共代码增加对应版型定义,对应文件board/siflower/sfax8_common/siflower.c和board/siflower/sfax8_common/Kconfig,主要用于新版型定义的使用方式。
增加对应版型的Kconfig,对应文件arch/mips/mach-sfax8/Kconfig,用于make menuconfig时供用户选择此版型;
增加新版型的defconfig配置文件,对应文件configs/sfa28_mpw0_ac28_defconfig,对应版型的所有参数,可以通过拷贝相似版型的配置文件得来,并通过
make menuconfig重新进行个性化配置;- 增加新版型编译方式,对应文件sf_make.sh,如下:
225 ac28) 226 DEFCONFIG="sfa28_"$ver"_ac28" 227 add_sfbl_flag sf19a28_mpw0=1 228 add_sfbl_flag crystal_40m=1 229 add_sfbl_flag odt=0 230 # [ -z $ddr2 ] && ddr2=em68b16cwqh 231 [ -z $ddr2 ] && ddr2=pme809416dbr 232 ;; - 其他:新增版型一般不需要修改dts,如果需要修改i2c、uart、gpio等硬件信息时需要修改dts,对应文件arch/mips/dts/sfa28_mpw0.dts
以太网驱动适配
当新增版型引入了新的有线设备时,需要对应适配以太网驱动,对应文件drivers/net/sfa18_gmac.c,详细引入新的有线设备(gphy、gswitch)可以参考:gmac外围芯片对接手册
Uboot物料对接
Siflower Uboot支持多种物料对接,包含不同DDR和Flash型号,详细参考:Flash和DDR物料调试指南
DDR通用参数使用配置
现在uboot代码中支持较为普遍的1G和2G容量的DDR3,以及512M和1G容量的DDR2。分别参照《JEDEC Standard No.79-3A》协议标准文档和《JEDEC Standard No.79-2F》协议标准文档,进行时序参数整理和DDR通用代码实现。 在编译时,按照实际使用的物料容量在编译选择脚本文件sf_make.sh中进行对应ddr选择:
1Gb ddr3物料:
[ -z $ddr3 ] && ddr3=ddr3_1gcommon
2Gb ddr3物料:
[ -z $ddr3 ] &&; ddr3=ddr3_2gcommon
512Mb ddr2物料:
[ -z $ddr2 ] && ddr2=ddr2_512mcommon
1Gb ddr3物料:
[ -z $ddr2 ] &&; ddr2=ddr2_1gcommon
项目引用
参考文档
FAQ
Q:uboot烧录失败怎么处理
A:uboot烧录失败后无法继续通过uboot更新镜像,可通过irom usb下载,或者摘下flash使用烧录器的方式重新烧录镜像,详细使用方法参考:快速入门
Q:uboot中gpio使用例子 A: 如果想要在uboot中对gpio进行设置,以在uboot代码的common/main.c main_loop函数中加入控制gpio12的代码为例
#define msleep(a)      udelay(a * 1000)
#define ssleep(a)      msleep(a * 1000)
/* We come here after U-Boot is initialised and ready to process commands */
#include <asm/gpio.h>
void main_loop(void)
{
        const char *s;

        if (gpio_request(12, "sf_gpio")) {  //申请GPIO
                        printf("Failed to request gpio %d\n",12);
        }
        if (gpio_direction_output(12,1)) {  //配置GPIO输入/输出
                                   printf("Failed to set gpio value %d\n",12);
        }
        for (;;) {
                msleep(1000);
                gpio_set_value(12,0);     //设置GPIO高低电平
                msleep(1000);
                gpio_set_value(12,1);
        }
        gpio_free(12);
        bootstage_mark_name(BOOTSTAGE_ID_MAIN_LOOP, "main_loop");

#ifdef CONFIG_VERSION_VARIABLE
        setenv("ver", version_string);  /* set version variable */
#endif /* CONFIG_VERSION_VARIABLE */

        cli_init();

        run_preboot_environment_command();
..
...
....
}
Q:如何修改cpu clk A: cpu clk = CPU_PLL / 分频比 CPU_PLL的计算方式如下:(我们的外部晶振一般是40MHZ频率)
- 配置PLL PLL计算的分频公式见下图。
Fref :参考时钟,一般为外部晶振频率。
Refdiv:参考时钟,分频参数。
Fbdiv:升频参数,实现整数部分。
Frac:升频参数,实现小数部分。(小数部分暂不支持,使用的时候忽略)
Postdiv1:升频后,再做分频参数1。
Postdiv2:升频后,再做分频参数2。
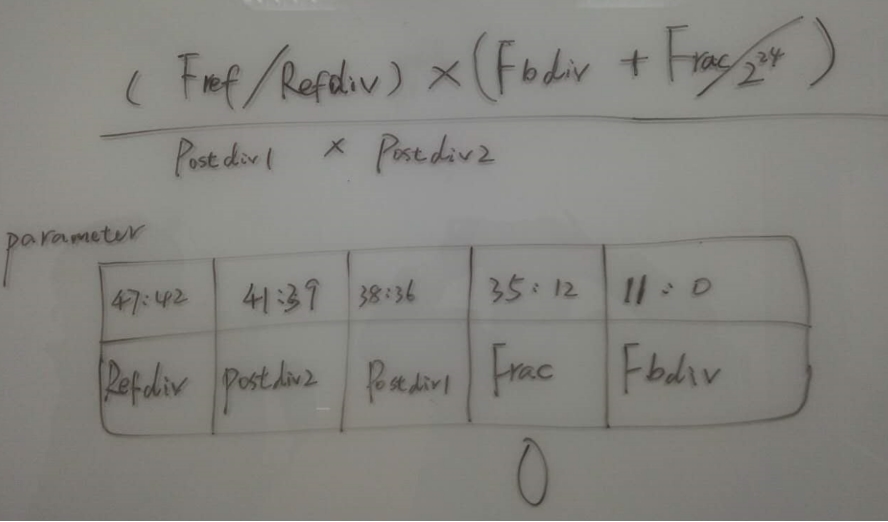
parmmeter寄存器参数如下,CM_PLL_BASEADDR=0x19E01000

- 配置cpu clk分频比 寄存器信息如下, CM_CFG_BASEADDR=0x19E01500

注意该寄存器配置的分频比应该为寄存器里的值加1
0-> 1分频
1-> 2分频
2-> 3分频
- uboot中代码的位置
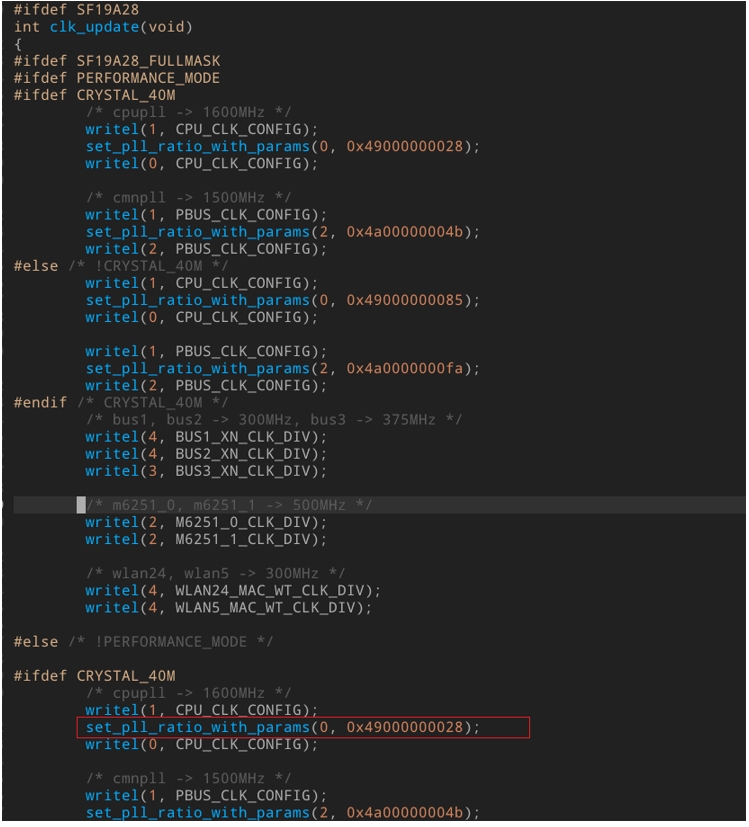
- 修改PLL,代码路径
uboot/bare_spl/common/clk.c
修改如下红框的位置, 此处为修改PLL
- 修改PLL,代码路径
- 修改分频比
默认为2分频,如有需要,请自行在合适位置修改, 通过配置前面所述配置分频比的寄存器。
文档信息
- 本文作者:Phoenix
- 本文链接:https://siflower.github.io/2020/09/08/ubootDevelopmentManual/
- 版权声明:自由转载-非商用-非衍生-保持署名(创意共享3.0许可证)